There are two primary models for DogPay Card-as-a-Service (CaaS) integration, tailored to different business needs regarding fund custody and licensing.
PaaS Model
Model Overview
In the PaaS Model, the API client interacts with DogPay APIs on behalf of the end user to create wallets, transfer funds, and issue cards. This is an end-to-end compliant solution specifically designed for businesses that do not hold any financial licenses.
Funds Flow
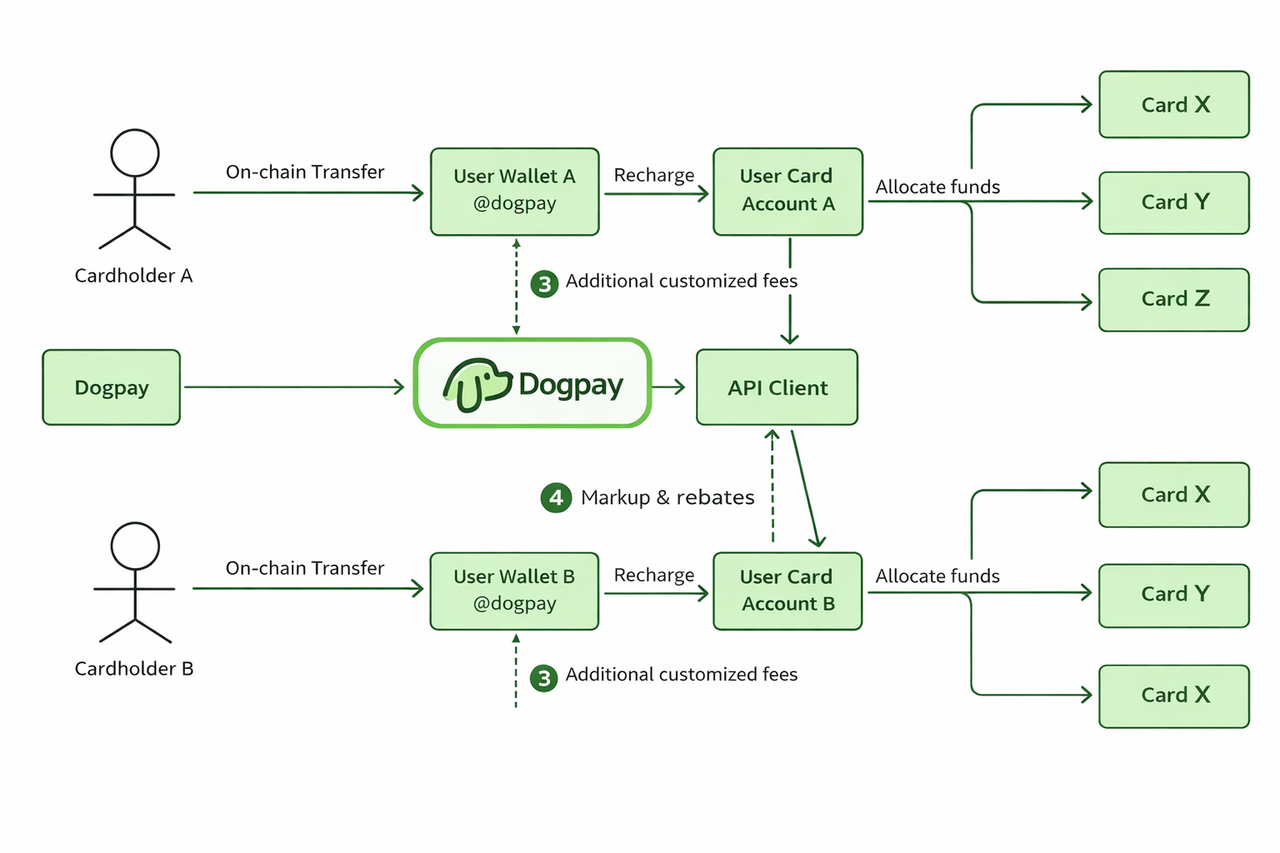
The model ensures the funds remain securely custodied by DogPay. The API client does not directly hold the funds. It makes this an end-to-end compliant solution for businesses that do not hold any licenses.
The funds flow is illustrated as below. DogPay's crypto wallet infrastructure generates unique wallet addresses for each user(cardholder) to top up. Then the funds are transferred to the user's Card Account. Cards are created associated with the user's Card Account and funds will be allocated to the cards.
Fees and revenue
Base fee markup configuration
Dogpay applies base fees, allowing clients to configure and add markup on these fees. The API client receives the markup revenue and rebates from DogPay based on the configured rates. DogPay also offers flexible fee customization, allowing clients to set specific markups for individual users, providing greater control over pricing and fee structures.
Default Setup: If the DogPay base fee for top-ups is 0.1%, the client can set a 0.4% markup.
End User Cost: The user is charged a total of 0.5%, and the client earns the 0.4% difference as revenue.
VIP Customization: Clients can set lower markups (e.g., 0.2%) for specific VIP users.
Additional fees
The client may also set their own fee scheme in addition to the base fee structure. For example, if the client sets the monthly card fee $10 per card. At the beginning of each month, the client could transfer the monthly fee from the user's Card Account to his account by API request.
Merchant-of-Record (MoR) Model
Funds flow
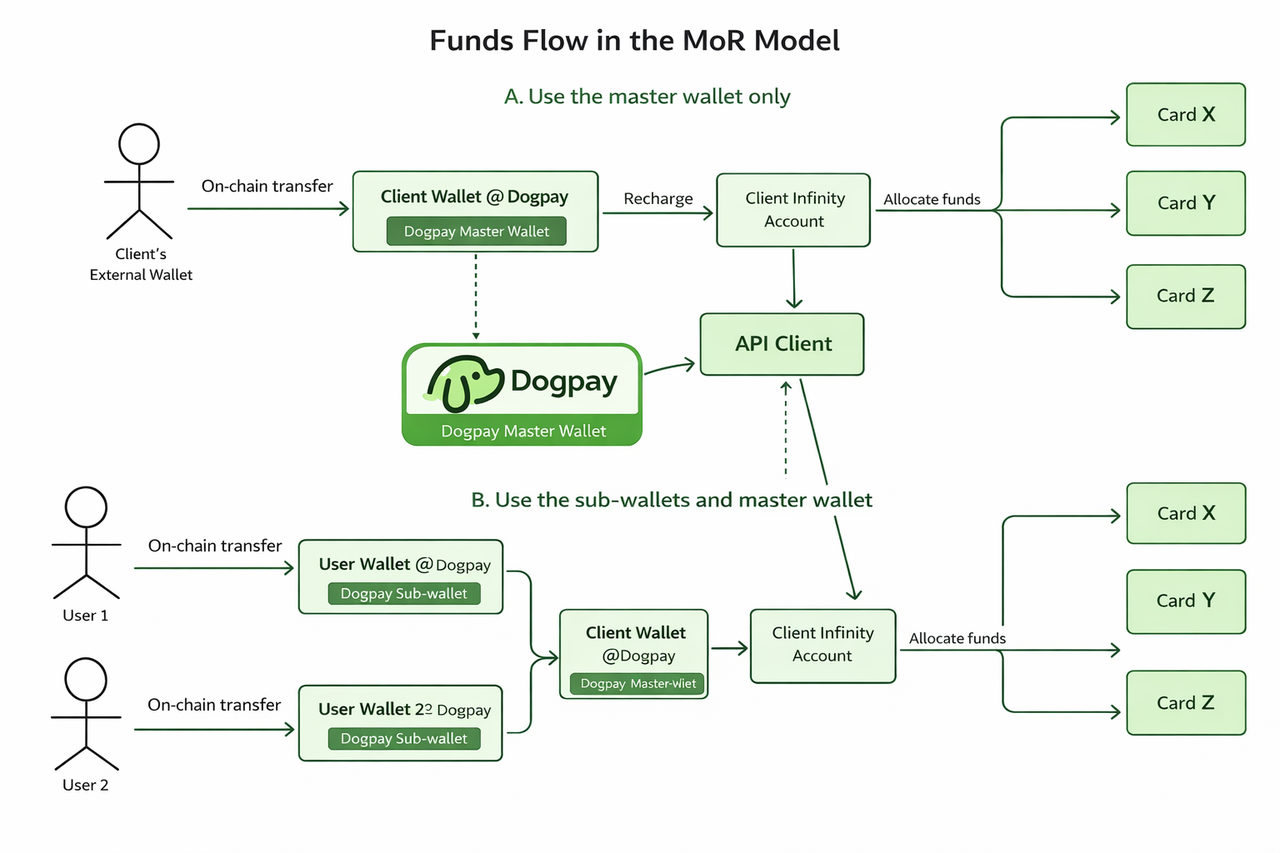
In the MoR Model, a single business entity is onboarded as the issuing party, with all issued cards linked to that entity. The entity can then assign these cards to different customers or individuals, who use the cards as their own.
With the MoR model, the API client will hold the end users funds. The funds flow is as follows. In Use Case A the client uses its own external wallet to receive the cardholder's top-ups and transfer to their DogPay wallet. In Use Case B the client uses DogPay wallet API to generate a wallet for each cardholders to receive crypto, which is similar to the Gateway Model. Then the funds will be swept into the client's wallet.
When the client deposits fiat or crypto, the spending power they can allocate to cards equals the balance in their Card Account. The cardholders, who are the client’s end users, fund the client’s wallet independently of DogPay. The client retains custody of their own wallet and maintains an internal ledger to track each cardholder's spending limit.
This model operates as if the client deposits funds into the DogPay Reserve (e.g. the DogPay Card Account), which grants them credit to spend. As purchases are made, the reserve balance decreases. To ensure sufficient spending power, the client must periodically transfer user-provided funds to the DogPay Reserve.
For example, if the client deposits 100k USDC into their DogPay Crypto Asset account and transfers it to the Card Account, they can assign up to $100k in total card limits. Meanwhile, their users deposit 150k USDC into their wallets. On the client’s internal ledger, users are assigned $150k in spending credit, exceeding the actual Reserve balance. In practice, this works because users are unlikely to spend the full amount at once. The client must, however, top up the Reserve as needed to maintain spending capability.
Fees and revenue
DogPay charges fees to the client, while the client has the flexibility to set their own fee structure for end users, allowing independent pricing separate from DogPay's charges.
Comparison & Target Audience
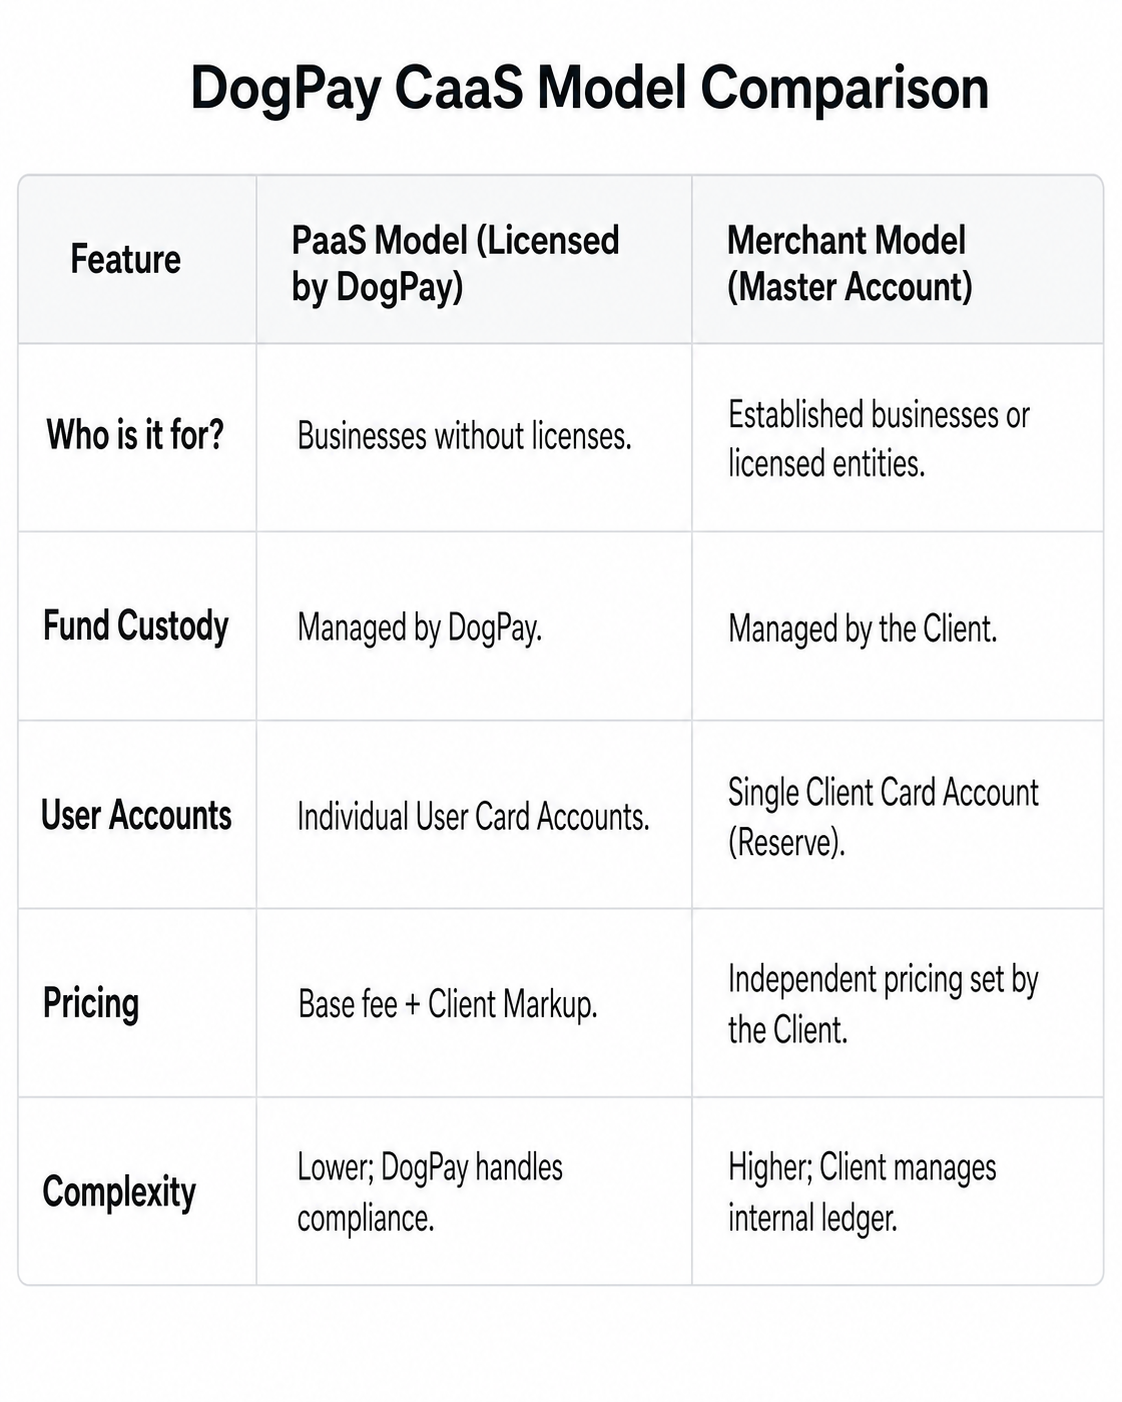
Here’s a basic step-by-step integration guide to help you get started with DogPay’s Card-as-a-Service (CaaS) platform:
1. Complete your basic company KYC
To activate your API environment, you’ll first need to complete a simplified KYC review.
This ensures your business information is verified and allows you to begin integration securely.
💡 Note:
During the KYC process, you can already access the sandbox environment for initial testing and API validation.
2. Generate your API key
Once your account is verified, generate your unique API key:
Dashboard > API Keys
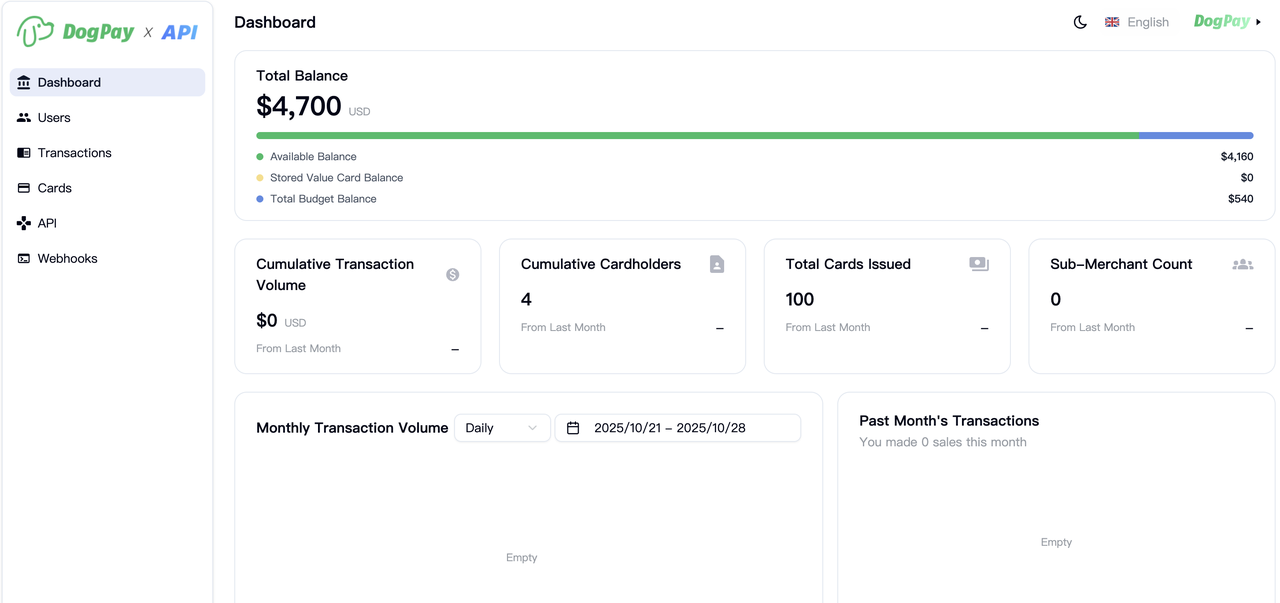
The API key is required for all CaaS endpoints, including card issuance, user creation, and transaction actions.
3. Add your IP whitelist and callback URL
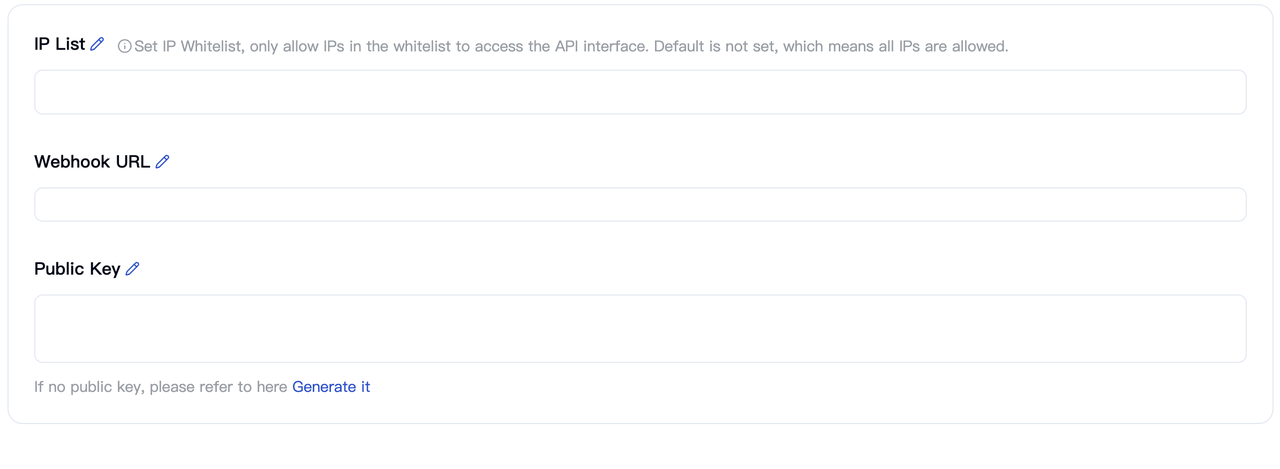
To ensure security and proper transaction callbacks:
• Go to Dashboard > API > IP Whitelist and add your server IPs.
• Set up your Webhook Callback URL under here to receive real-time notifications such as card activation, top-up confirmation, or transaction status updates.
4. Beginning integration testing
Once the configuration is complete, use the sandbox API environment to simulate key operations:
• Create virtual cards
• Test top-up and spending flows
• Validate webhook callbacks
• After successful sandbox validation, you can request to switch to production mode.